|
|
|
|
|
|
|
2005 Blog (Read bottom up) 12/29/05 I'm finished with final planing on the two 2 pc rods. I've left the butts a little under my desired final dimensions. Hopefully this will compensate for the extra glue and give me a final taper that's spot on. I've been tooling around with designing a 7ft version of the FUBAR rod and I've added it to my list to build. 12/27/05 I'd like to say that I'm well on my way to finishing the rods, but I'm not. I took both 3pc rods down to the
casting ponds Friday. I'm not sure I can draw a valid conclusion re:
ferrules. I don't think the rods are similar enough. I made the rod from
two different culms, one flamed the other not. I think this is affecting
my comparison. 12/18/05 It did nothing but rain all weekend. It was wet and cold and I didn't get a chance to go to the casting ponds. I didn't manage to test cast rod #9 with two different guide configurations but I still need to go down to the ponds to finalize the stripper placement. I won't get a chance to do that until after the new year. Rod number 10 gave me some trouble this weekend. The reel seat was slightly off center so I had to heat it over a heat gun and give it a slight twist. I haven't had a second chance to test cast it. I successfully tested my rod dipping motor. 12/16/05 I'm feeling like crap again but hopefully I can get both butt section planed this weekend. I put two coats of Tru Oil on the Ironwood reel seat tonight and started final planing the butts. 12/15/05 I'm feeling pretty good. I test cast rod number 10 today. It's not bad, a bit smoother than 9, which is a slight surprise. It looks as if it's going to be a solid DT4wt. I glued the reel seat of number 9 on tonight. Tomorrow I'll add some finish to the reel seat. If it doesn't rain, both rods will go down to the casting ponds on Sunday for the final touches on guide placement. I should be able to knock out one of the butt sections of the other rods on Saturday. 12/13/05 I'm just now starting to feel better. Last week I did some work on the lathe, making grips and reel seats and setting ferrules but couldn't do much as my sinus were killing me. I'm learning a bit about working in the winter. The grips that I glued up didn't cure properly. On one rod the glue was still wet when I started to turn it down on the lathe, despite being clamped for 24 hours. I unclamped the other rod too soon and the cork pulled away from each other and left 3 really large glue lines. I had to cut the entire grip off and start again. Tomorrow I'll turn down a new grip and install the reel seats. The reel seat I made turned out ok. The fellow I'm making the rod for asked that it have a reel seat made from this Jamaican "Ironwood". It's not the best seat but it should be functional. The "Ironwood" is tough stuff and I went through two saw blades and drill bit working with it. Definitely not worth it when you buy a reel seat spacer for $6.00. It probably cost me $150 bucks to make that spacer if I include all the extra equipment I had to purchase. I took rod number 9 out for test cast today. It's nice but not exceptional. It casts a 4wt and a 5wt equally well but I'm probably leaning toward 4wt. A decision will have to wait until I get a chance to take it to the casting ponds.
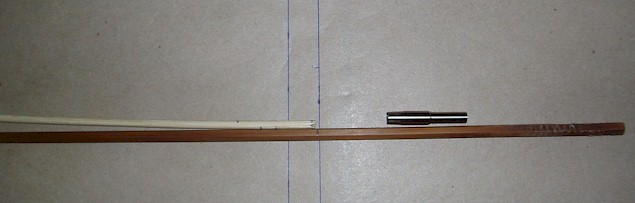
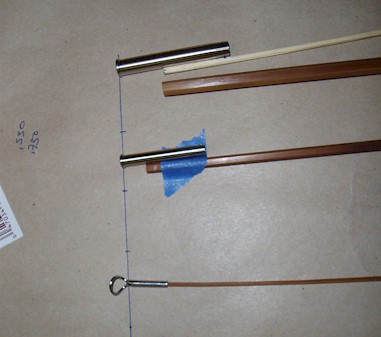
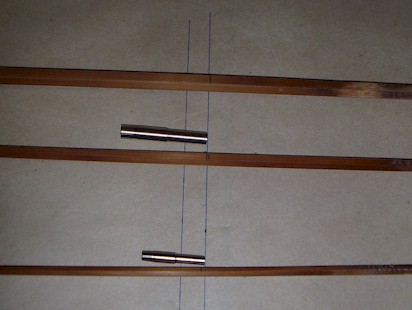
12/05/05 9:12 PM Geez I'm, bored. It's too cold to work in the shop and I've slept enough today that I'll probably be up until 3am. I've had enough TV to last a week, so what to do. Update the web site I guess. Between naps today I managed to size the blanks. The garage gets the mid day sun. It warmed up enough to be comfortable for a couple of hours, my sinuses told me when it was time to come in. Sizing a blank can be a confusing processes for some folks. It's the sort of thing that gets more confusing the more you think about it. I like to keep it simple, the section length is simply the length of the blank in inches plus the amount the ferrules seat in inches divided by the number of sections. Sounds pretty easy doesn't it. I've come up with a little visual aid to ensure I don't miss cut the pieces. First, I layout some paper and mark two lines. For a 3pc 7 1/2 feet rod like I'm making now, I simply divide the length in inches by the number of sections and mark two lines on the paper. In this case they are 30 inches apart. I then determine how much the ferrules will seat, in this case about an inch and a quarter and divide it by 3. That's the additional length the sections must be, so I make an additional line beyond the second. I then layout my rod and components. I like my rods to be slightly long on the tip and generally take my measurement from the bottom of the tip top eye. Using a small stick, I line up the ferrule next to its section. I line up the end of the ferrule with the second section length line.
I remove the ferrule from the stick and mark on the blank where the stick ends. I do the same with all pieces and voila, the rod is sized.
To make sure keep the taper, I measure where the actual cut line is on the first section. Since I overlap the measurements on my sections 5 inches, I can make sure that the taper is continuous. If the first section is 30 1/4 inches, than I cut a quarter inch from the top of the second section. I measure the cut point on the second section and adjust the starting point on the 3rd section if necessary. Ok, that took half an hour, now what do I do...........maybe I can find some tapers to play with. 12/05/05 8:00 AM I've finished planing the tip from rods 11 and 12. Rod 12 looks like it's going to make a nice rod. It seems to have a little more resilience than 11. I had a busy weekend and scraped both rods 9 and 10. I also ripped the back and front door for my new dipping box. I became sick Sunday so I didn't get as far along as I had hoped. I'm home sick from work now. Maybe if I feel better I'll get some work done but I doubt it. I ran out of sand paper last night so I went to Hope Depot to get some more. They carry some really cheap sand paper that didn't work at all. I had to go to Yard Birds to find some 3M paper. Seems that Yard Birds has been bought out by Home Depot. I hope they don't change their assortment, it's generally much better than home depot. A little more expensive but there's a lot to say for quality. 12/03/05 Went to the rod rack to pick up some guides, cork and grips. I forgot how cheap everything there can be. I picked up some cheap guides for rods 9 and 11 and a cheap grip for rod 11. I'm not sure what I'm going to do for a reel seat on rod 9. I'm going to make a custom grip for rod 9 because despite it's flaws, if I end up liking it, I want it to be comfortable. I got my guide order from Snake Brand today. Looks like I'm set for another 20 rods. Now if I could only get my cork order....... 12/01/05 6:00 AM I trouble sleeping last night. I kept thinking about that node problem and finally decided that I couldn't finish the rod out with a bad butt section. So this morning I went down to the shop to rough out a new butt when a quick double check of the tip section shows it has the same problem. So what does this mean, well, rather than scap the whole thing, I'll finish the rod out with lower quality components and see what there is to see. 11/30/05 It was all going so well.......I pulled rod #9 out of the drying brackets. It didn't quite work as expected. The rods seem to be twist free, which is a big bonus but they're still not straight.
I'm going to need to do a little more experimentation . I've glued up rod number 10 using the garrison binder. Things went pretty well. I've got them hanging to dry as I normally would. I'll compare the two after scraping to see which way seems to work best. Maybe a combination of both might work. I now know which rod I'm keeping. It'll be rod number 9. I accidentally placed all the nodes next to each other. I still can't figure out how I did that or how I missed it but that is a structural no-no. It's only in the butt section and I guess I can make a new butt section if I chose. Again, its another rod I keep for myself to see what affect a particular mistake will have over time. This particular mistake suggests that I've made a week rod which would break under sufficient strain. In practice though, I think I'll find that it might affect the action but that the rod will fish fine. HI and Montague made tons of rods with nodes placed next to each other. Any other rod maker would probably just trash the section but I guess I'm not at that stage where I can simply trash 20 hours of work. I'll keep it for myself as a back up and when it breaks, I'll make a new butt. Rod #10 is going just fine, thank you very much. I worked tonight to take out a small twist, we'll see how it dries.
11/29/05 11pm Rod number 10 is ready for gluing. I did a quick inventory and it looks like I need some guides, a ferrule and enough cork for two rods. I have guides on order but I doubt they'll arrive on time. Looks like I'll have to make a trip to the Rod Rack this weekend. 11/29/05 I glued up the first blank last night. All went well. I decided to use the 4 string binder and I’m glad I did. The 4 string binder has a motor and run via a foot pedal, leaving me with two free hands. I stopped using the binder because I was getting nasty twists and curves with it. To resolve this problem I lowered the tension. The tension is still much more than with the garrison binder but the lower tension seemed to help. I feed the rod through with the wheels at a lower speed for more control. I still seemed to get some curves and I’m sure I got twists but hopefully the new drying jig will work.
I made the jigs last night and the results look promising. I’m going to let the glue dry for two days before removing the blanks.
Tonight I’ll finish planing the tip for the second rod and review my reel seat, ferrule and cork situation. I suspect that I’m going to have to order a ferrule and reel seat for the 4th rod. I may also have to pick up some cork.
11/27/05 We'll, I didn't get as much done this weekend as I hoped. Vita and I spent Thanksgiving with my in-laws in Modesto and since I had a lot of rod work to do, I brought the planes, splines and form with me. They have an "extra" kitchen, so I set up in there and managed to knock out a complete rod.
I was really hoping to get 3 rods planed this weekend but it didn't happen. I'm 4 splines away from finishing the second rod. I could have probably finished the second rod tonight but I sensed I was getting a little tired and sloppy. All I wanted to do was finish the spline I was working on and call it a night when, true to form, I snapped the tip. Fortunately, it snapped three quarters of an inch from the tip. I usually leave about a half inch at the tip so that really only meant that the tip was just slightly off. No problem, I moved the spline down a quarter of an inch and ran my razor blade down the form a couple of times. I might start gluing tomorrow or Tuesday. Before I start gluing I've got to make a straightening jig. I picked some L shaped aluminum at the hardware store and I'm going to use it to keep the blank straight while drying. The aluminum is about 5 feet long, one inch wide and a quarter inch think. The plan is to drill holes in the aluminum at 1 inch or 1.5 inch intervals. I'll lay the blank in the L and synch it down using cable ties. The blanks will hopefully dry straight and twist free. I've done a little flexing of the blanks. My numbers are pretty good and it's interesting that the blank that was darkly flamed seems a tad bit faster. This is what you'd expect but it was interesting none the less, given that both where heat treated for the same time. I guess it goes to show that flaming has an affect other than simply coloring the rod. 11/18/05 I'm ready for final planning. The planes are sharp, the form is set and the blanks have been heat treated. Heat treating went we'll except for one blank that started to burn on the edges. I'm not sure what happened there. The thermometer didn't show anything unusual. 11/14/05 Almost done roughing the last blank. 40 min. tomorrow ought to do it. I spent a little time truing the butt side of my forms today, that is I used a file to flatten the surface. I'll work the tip side tomorrow, maybe heat treat the strips and sharpen some blades and I should be final planning by Thursday. 11/13/05
I've been thinking a lot about about a dip tube this week and have come up with a plan to make 96x15x12 cabinet to dip and dry the rods in. I should be able to get a motor for removing the rods locally at a place called Granger. The cabinet will have two small lights for heat and several hooks to hang rods from. I haven't yet decided on the material for the tube. On the one hand, pvc is cheap and disposable; but, something like copper tubing can be heated. Heating the varnish slightly would allow me to put on thinner coats. 11/02/05 I've been straightening, flattening nodes and scraping. I've also been tweaking the Payne 100 taper to a workable 3pc version. I think I've got something workable and the best thing is I don't have to buy new ferrules. I'm a couple chapters into Garrison's A Masters Guide to Building a Bamboo Fly Rod. I'm really enjoying the precision in which he seemed to make his rods. He was a bit of a freak though, the man would stagger his splines in such a way that after he cut them, he'd have to add back cane by splicing or gluing smaller pieces to the larger pieces to achieve a final desired length. This instead of simply staggering in such a way as to achieve the full length from what he had to work with (8ft culms). Freak-a-zoid to be sure. 10/27/05 I've decided to make 4 Payne 100 rods. Two 2 piece rods of slightly different tapers (Mauer and Brooks) and two 3 piece rods based on a taper I came up with using RODDNA to convert the Mauer taper into a 3pc. This way I can make 4 rods and keep either a 3pc rod or one of the 2 pc rods depending on which one I like most. I'll probably have to order new ferrules, but that's ok. I've separated out the cane, using the cane that was originally picked out for rods 7 and 11. The cane has already been sanded and straightened. I use steam to do some touch up straightening tonight. 10/26/05 I just found out that Andre Puyans passed away last night….It was posted all over the internet but I called around to friends to see if it was true and it is….It’s sad, I’m sad. Andy was my fly tying instructor and had pestered me for years to go on one of his trips. I finally did this year. Andy was too sick to participate much but the school was a once in a life time experience. I enjoyed myself so much that I was planning to attend again next year. Andy’s had a greater impact on American fly fishing than most people know. He will be greatly missed. 10/25/05 Well, I’ve started on the next 3 or 4 rods. They’re going to either be all the same taper or they’re going to be two of one taper and two of another. If there all one taper than I’ll give away 3 rods, if not, I’ll only give away two. As always, I’m waffling on which taper to make. It will either be a 7’6” 4wt version of the light line rod, or a 3pc version of the Payne 100 or a 7’6” version of the Payne 200L. I’ve played around with rod dna and my rod comparison tool and think I have something that should work. The problem of course is that, once again, I’m swimming in uncharted waters. None of these tapers have been made before in these precise configurations so I don’t know for sure if they’ll work. The taper that I end up making will probably depend on what ferrules I have. I have 3 or 4 sets of multi piece ferrules which are all around the same size. I suspect that I’ll end up not making any of these rods. I suspect that I have a bunch of 11/17s and 10/15 sitting around. These tapers take a 9/14 or 9/15.
I attended the Great Western Rod Makers gathering last weekend. It was fun but not quite what I expected. More so than Chucks gathering, this years gathering seemed to get a lot of play on the internet. It sounded like it was going to be larger than in years past but in the end really wasn’t any bigger than the gatherings in Bishop. Chuck wasn’t able to make it and neither were most of the LA guys. There were surprising few Bay Area rod makers and fewer rods to cast than I expected. The Pacific Northwest guys more than made up for the absence of Northern Californians. They were a great group and fun to hang around. This years gathering saw presentations by Master Caster and Ray Gould as well as presentations on a node pressing machine and milling machine. Ray Gould was very nice and checked out my FUBAR rod. Actually, a lot of people checked out the FUBAR rod, which was embarrassing. I did such a bad job on that rod that I really didn’t want to show it around. I had it with me to fish and cast. The rod can be tiring to cast but isn’t tiring the fish with. At first I thought it was the rods weight but now I’m thinking that it’s the grip; I made the small of the grip too small, which is cramping my hand. The Master Caster was incredible. Not simply because he was a great caster, he was, but because he was a creative caster. His wife says that they’re coming out with a book, which I’m sure will be a must read once it hits the shelves. The milling machine was interesting. You type your taper into a computer and it mills a rod to final taper with .0005 accuracy or something close to it. You could literally put out 50 blanks a day and it allows the taper at one inch intervals. For $12,000 it’s a small investment for a large company and you’d think that a company like Diamondback would use such a machine to create their rods. Word is that their rods are being made in China, which, even if it proves not to be true, has garnered them enough bad publicity in the past month to last a year. It’s an issue that has been bandied about on Clarks Board and you’d think that Diamondback would chime in right away and clear the air but they haven’t. I cast 3 rods I really liked- a Thramer Payne 200L, a Young Para 15 4wt by Mike Shay and a Japanese rod that friend of mine brought. He hates the rod but it didn’t seem to bad to me. It had an interesting action and hopefully I can mic the rod soon.
10/20/05 The rod or more appropriately, the rods are done. While I’ve been wrapping rod #8 I’ve also been wrapping a graphite rod for a friend of mine. The graphite rod is pretty old. He had it for 3 or 4 years before finally giving it to me to build up for him 2 years ago. It’s a Loomis GL3 or GL4 I think and it’s sitting in the drying box with the light line rod. The light line rod was given 4 coats of hand rubbed varnish, with 3 thin coats on the wraps. The wraps are probably a bit underdone but I don’t want to affect the rod action too much my laying on layer upon layer of varnish on the wraps. The 4 coats of varnish is less than I usually use but the Epifanes concoction I made is a little thicker than my tung oil/Man of War mix. I’m looking forward to tweaking the light line taper but I‘ve got several rods I need to work on first so, I ran the final light line taper through ROD DNA and came up with a 7’6” 4wt which I’ll make instead of the Sir D rods.
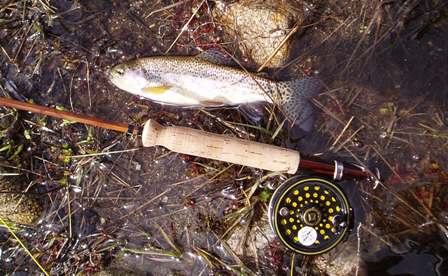
10/15/05 We have a winner. Despite all it's problems, this is a great casting rod! I took it down to the casting ponds and wow! What a rod! It does everything I wanted it to do. It'll cast just the leader and it will aerialize 60 ft of line. It throws nice comfortable loops at 30ft and nice tight loops at 60 with a well timed haul. The rod is a little heavier than I initially imagined and is perhaps a half a line weight too heavy but it definately has potential. It casts a DT5 very well and does everything I wanted. It shoots a TT 6 like a rocket. I'm definitely going to have to tweak things and try producing the rod as a 4wt but it should be a great fishing rod as is, if the last coat of varnish and guide wraps don't mess things up. 10/14/05
The bad glue job that I did resulted in a rod which was off the mark rather severely in places. Since this is a prototype rod I decided to cast the rod as it was originally and then shave off powerfibers to hit where the rod is supposed to be. Unfortunately, I made this decision after I stained the rod and wiped on a single coat of varnish. So, I took the ferruled, scraped, stained and varnished rod out for a test cast. I hadn’t put the grip on yet because I would need to shave off powerfibers underneath it. I used a towel at first to simulate a grip and quickly tossed that and simply went hand to cane.
Initially the rod felt pretty good. It was a bit stiff but threw nice loops at 10ft as well as 35ft. It seemed to be a good roll caster but was too stiff in the butt for me to feel the rod. In retrospect, I probably should have changed the rod sections by section, making casts between each change. I didn’t do that although my initial gut instinct was to simply change trim the butt. Using my computer I determined where and how much bamboo to take off. I didn’t want to take power fibers off the entire rod, so I simply modified the stress curves until I got the curve of the original taper, only a little lower, ie. a little thicker.
This did change the rod. Casts weren’t as tight, the tip tended to flip over like it had a “hinge” and you could better feel what the line was doing. I’m sure which rod was better. I liked the directness of the first rod and the line feel of the second rod and didn’t care much for the hinge. I think the thicker tip and perhaps thicker mid would have been better. We’ll see if the rod still has that hinge feel after the guides are put on.
After the test casts, I tried to re-stain the rod. This was problematic because I hadn’t sanded down the entire rod and it was hard to identically match the color. The touch ups look pretty obvious to me but like I said, it’s protype. 10/13/05 Boy what week! I'm too tied to go into detail. I've been working until about 2am every night and the rod is f.u.b.a.r.. I still plan to fish it a week from Sunday. 10/05/05 I glued the rod up tonight. I forgot to change the weight on the binder, the entire rod was wrapped with the weight I usually use for the tips. Besides larger glue lines from the rod not being tight, I'm not sure what other problems there may be. I guess action would be affected from the extra glue. I planed the rod down before gluing so that should be ok. I also used a roller to help straighten the rod. I don't think I'll do that again. The roller seemed to force the sections out of round. We'll see. I need to order some ferrules, I thought I had the right size but nope, I'll have to have some fed exed out to me. Guess this means I can give step down ferrules a try. 10/04/05 I'm finished with final planing. I'll glue the rod tomorrow. So far the rod is looking pretty close:
Stations 10, 15 and 60 look a bit heavy. 60 should be dead on according to my notes. Each spline measurement was dead on or .001 below target, so maybe my angles were bad or I simply mic'ed it wrong. Either way, I can put the rod back in the forms and knock a few thousands off before I glue the rod together or I can take it off after I glue up the rod. There are benefits to both I suppose. If I take the rod down before gluing up might come in short but if I do it after glue up, then I'm digging into the powerfibers.
10/01/05 I've finished planing the butt and mid sections today. I doubt I'll get through the tip tomorrow but maybe I'll be ready to glue before Tuesday. My node work on this rod isn't as good as on the last. I wish I had taken better notes with number 7. 9/29/05 Not breaking any records. Planing about 1 strip a day. 9/26/05 I fished rod #6 this weekend. I wanted to make sure that the newly re-glued tip top would be ok. It did fine. I'm was tempted to use epoxy to glue the tip top, but I've used the stick glue for years without problems.
The ferrules were starting to stick. It's really disappointing because they seem to oxidize so quickly and then they become a problem. If I can fix my ferrule looseness problem then the sticking won't be so bad. As it is, I'm going to have to re-glue the ferrules for rods #2 - #5. I suspect #6 will need re-gluing as well. #7 should be ok. I used golf shaft epoxy on it. I'm sure the ferrules are oxidizing though. Hopefully I get some feed back soon. Started planning the Nor LL. Hopefully I'll have it planed out and glued by Sunday. 9/19/05 Each night after working in the shop I finish off by taking rod #3 out for a spin. Despite all it's problems and despite the fact that it didn't turn out as expected, I really like it. I hadn't planned on fishing it but I may do just that. Cut some wood for reel seats and sharpened the blade on the LN. 9/18/05 The Nor LL is ready for final planning. I cooked it the other night at 350 for 30min. which I think might be too much. Unlike the last time, the oven shot back up to 350 in 5min as opposed to 15min so the cane cooked for 25min between 340 and 360. I picked up additional thermometers for the top and bottom. There seems to be a 50 degree difference between the very top and bottom of the oven. Before I put the cane in all three were at 350 but afterwards they wouldn't stabilize. I also treated myself to Lie Nielsen 9 1/2 plane with the rod makers groove and the new Veritas mark II sharpening system. It looks like it will work better than the old system.
9/11/05 The tip on #6 came off when I was wrapping and instead of re-gluing I simply reapplied the tip with the existing melt glue. This was a mistake and the tip came off again, this time while fishing. I've glued a new tip on and hopefully, this time it will stay. I've started roughing the NOR LL. 9/01/05 Right. I've done some switching around of the rods I'm working on. I've decided to make a rod for myself, before finishing the others. I've spent the week splitting and straightening. On Monday I'll probably start roughing. Then I'll work on the Payne 97. I thought the 100 was a 7ft rod but it's not so I've decided on the 97 instead. This rod is not for me so I'm going to cut another blank along with it to finish out later. I finally finished wrapping #6. I did a little experiment and used flex coat light on the wraps. I really like the little round build you get with flex coat on a graphite rod so I thought I'd give it a whirl. I used one less coat than I do on graphite and I'm not too sure I like the look on a cane rod.
The wraps on #6 are blue and the flexcoat darkened the wraps more than I thought it would, they look almost black. I was hoping for a medium blue transparent look. I think I need to do more experimenting before I come to a decision. It's not traditional but until I start dipping my rods, I need to try and find a wrap finish I like. I like the finish I did on rod #1 the best. It was a light finish, you can still feel the ribs in the thread but I'm sure I put 3 coats of whatever I used on it. I suspect it was thinned varathane but I don't know for sure. The really interesting thing about the flexcoat is that it really stiffened the rod. It's a fast rod anyway but now it's super quick. That's not bad though, the rod actually seems a bit more uniform in it's action then before and throws a wickedly tight line. It's be interesting to see how it fishes this weekend when I give it to it's new owner.
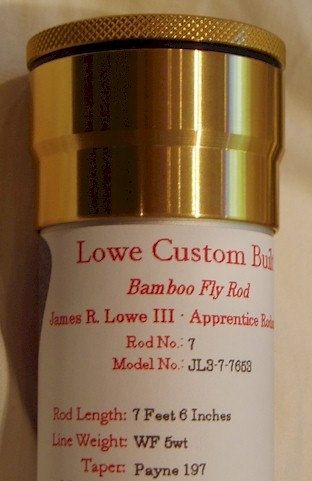
8/25/05 There's nothing like a
slow rod to awaken the senses and keep you on your toes. I finished
making a Payne 197 a couple of weeks ago and delivered it to a new owner
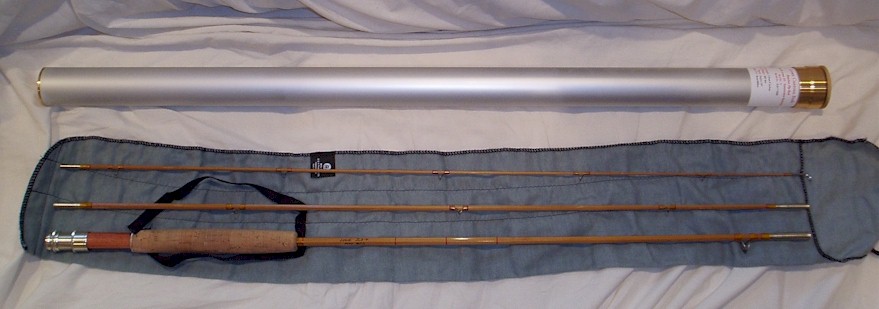
3 days later. 8/17/05 Rod #7 was delivered without incident. I met the follow at work and let him test cast the rod for a while. He could cast it about 20 feet and seemed to be adjusting his stroke pretty well with each cast. If he can learn to cast the 197 well he should be able to adjust to any rod. He seemed like a pretty nice guy and he liked the rod, so all is well. I tried to package the rod as professionally as possible, giving him a tube and sock. I even came up with a label.
I've decided to change rod # 8 to from a Driggs River to a Payne 100. I've got a couple of ideas swimming in my head and I really have to make more rods before I can start on them. I've got to get to know the actions and tapers better. I'm a little more eager to make the Payne than the Dickerson, so I think that's next. 8/07/05 Rod #10, which is really rod #7 since I bumped it up on the list, will be delivered to it's new owner. It's my first "commissioned" rod- $100 bucks to cover expenses. Boy, did I miscalculate!. I know better for next time though. I'm meeting with the guy tomorrow. I'll give him the choice of either taking the rod or getting his $100 bucks back. We'll see what happens. The rod is a classic medium slow bamboo action but not everyone appreciates that sort of thing. Regardless, it should be a good rod for California Trout fishing.
I'm still not happy with my cosmetics, I guess with practice I'll eventually get something I like. I noticed today that the wrap varnish didn't get to the interior of the guides very well, so I tried to dab some on. I also noticed that the feet of the stripping guide aren't flat. There's not much I can do about that now, hopefully it won't be a problem.
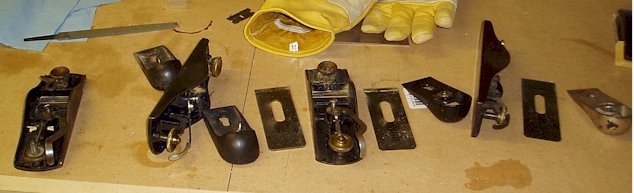
7/27/05 The rod's in the dryer with a second coat of varnish. The ferrules are fitted and I should be able to take the rod down to the casting ponds on Saturday for a test cast and to adjust the guides. The wiggle test shows that's it's a fairly uniform, deep flexing rod. Saturday's test should be interesting. I'm fairly pleased with how the planing of the rod turned out. The tip, dimensions were almost dead on, even though I forgot to removed the enamel, I left enough extra to hit the numbers. That's a nice surprise. The mid section has almost no spine to it, or at least it was really hard to find, which is interesting and kind of cool. It's oversized though, which may be a problem as far as action is concerned. The butt, which during planning I thought would turn out the best is a mess on one flat. I'm not sure why. Maybe my angles were off. Overall all though I'm pleased. I planed the rod butt to tip so I guess I got better as I went a long. I've also got a pretty good system worked out were by I only have to sharpen one per section on a 3 section rod. I now own 7 hand planes. A Stanley #3, a Stanley #4, a Craftsman 9 1/2 knock off, two Stanley 91/2, a Stanley #16 and a Stanley #18.
During final planning I use the 9 1/2 and 16 planes to get to within .010 and then use the 18 to finish. Sometimes I have to re-sharpen the 18 but the others stay sharp enough to do the job until I have to plane the next section. The 18 is slightly longer than the others. I've learned a lot with rod about how important prep work is. Before I heat treated the rod, I went back over the nodes and did additional sanding and straightening. I even did more sanding during final planning and I don't seem to have as many waves in the rod as I did and the rod came out dead straight and it appears without a twist. My binder wasn't tight enough so I seem to have more glue lines but I'd prefer glue lines over a twisted rod any day. 7/24/05 We'll, I'm back from Idaho. Final planning is complete on the 197 and the rod is glued up and hanging to dry. All went well except that I forgot to remove the enamel on the tip before planning. I've left it about .002 over sized so hopefully once the enamel is removed the dimensions will be on. I'll probably be ready to test cast it by mid week. Let's hope it's a 5wt.
6/26/05 I’ve decided to change the Dickerson 761510 to a Payne 197. I just wasn’t confidant that the 761510 was going to turn out to be a 5wt. The Dickerson book says that the 197 rod is slightly better so I decided to go with that. Just to make sure, I keyed both tapers into an excel application created by a fellow named Bob Norwood and the stress curve on the Payne was lower, which says to me that it’s a slightly stronger rod and should be a solid 5wt. Perhaps a little slower than the Dickerson but it should also be smother. I’ve finished rough planning #10 and once again I blew my beveller up. Suffice it to say I’ve given up the idea of using the rough beveller. I may use it to correct my angles but then again, what’s the point. As I get better my angles shouldn’t need correcting. I’ve only got one more set of tie downs left so I think the best option might simply be to sell it. I heat treated number #10 last night using the new oven. Boy, that didn’t go exactly as planned. I made the oven myself, the concept is sound and it works but it’s not retaining heat like it should. Either that or I’m blowing hot air down the wrong tube. Whatever it is, the outside of the oven is getting just as hot as the inside and that’s not supposed to happen. I suspect it’s the insulation I used. When I went to the local stove store to purchase some 400 degree or greater rated insulation, the fellow told me to simply go down to Home Depot and use their stuff, so that’s what I did……. Anyway, it’s a heat gun oven and I must have had it running nearly 50 minutes last night. The rod was heat treated for a total of 28 min. When I placed the rods in the oven the temp dropped dramatically so the rod cooked for 15 min while the oven heated back up (between 225 and 325 degrees) and then for 13 min at 325. I removed the rod when I sensed the smell change. There didn’t appear to be any change in color, which is good because it’s supposed to be a blond rod
6/16/05 1am One of the things that's been holding me back from starting the next batch of rods is the lack of a tempering over. We'll, tonight I finished making a heat gun oven. I'll test it tomorrow, which I guess is really today. I need some sleep. 6/15/05 Boy, time really flies once fishing seasons comes around. I started working the nodes for rod # 10. I sanded the nodes earlier but I doing some extra prep just to make sure the nodes are as trouble free during planing as possible.. I still need to wrap #6. 6 weeks and no rod work, where did it all go? 5/03/05 Rod #5 in now in the hands of a new owner. We fished both rods #4 and #5 this weekend. All went well. I think I'm going to take a few days off before finishing #6.
4/28/05
#5 is finished. I added some tipping and a coat of varnish last night.
4/27/05
#4 is finished and #5 is well on it's way. #4 has black wraps and #5 has gold. I'd forgotten how much I didn't like gold wraps until I'd applied finish. It looks so blasé, may be I can salvage it by applying some tipping tonight.
|
|
|
4/26/05
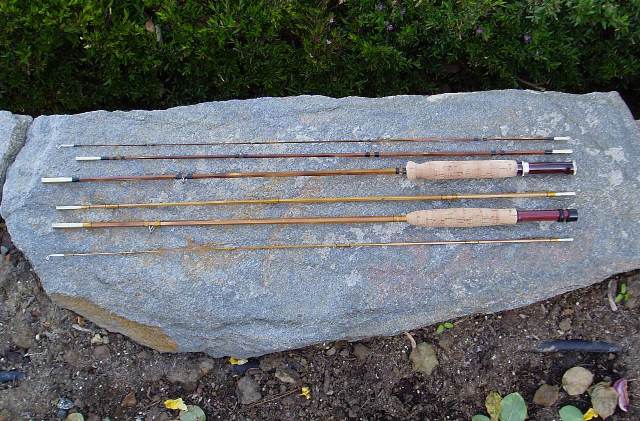
I mic'ed out rods #5 and #6 last night. Both we're off the mark but a little better. It seems I consistently made the mids too large. I'm not sure how that happened, maybe I transcribed the wrong figure to my forms. It also seems I cut the butts too high...very curious but probably a good thing. The hinge on this rod would normally fall on the ferrule. I've got it above the ferrule. Rod #6 looks like it will be the best of the 3, I need to take it for a test cast.
|
|
|
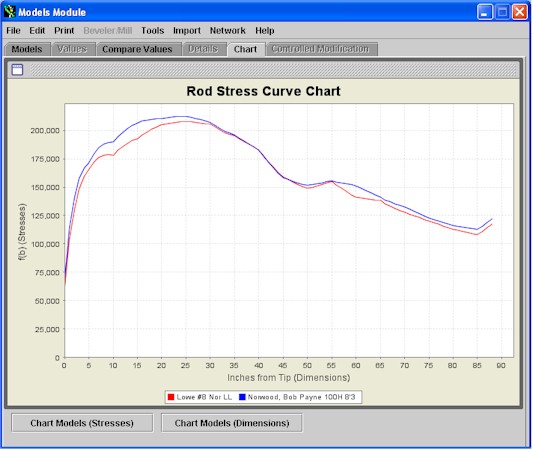
4/26/05
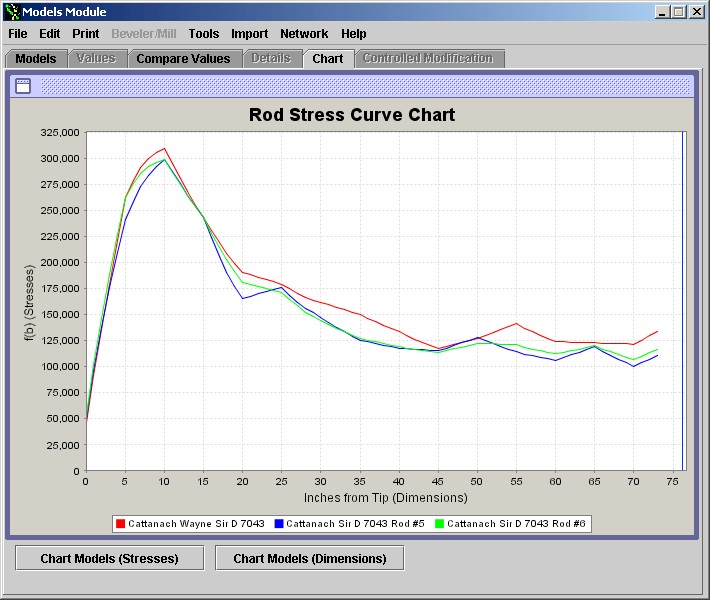
I test cast rods #4 and #5 this morning. They were not quite what I expected, both rods cast better with a WF5. The rod is rated as a DT4/WF5 but #2, which is based on the same taper, casts a DT4. I plugged the actual taper of #4 into RodDNA and it appears I missed the mark. A comparison of #4 to the target taper and rod #2 shows why. Below is a chart of the stress curve or "flavor" of the rod. The green line is my target taper. The red line is the actual taper of rod #2 and the blue line is the actual taper of rod #4.
The tip is too thin and the mid too thick. The high line at station 10 is a concern. The rod taper already allowed a high level of stress at this point, my taper is allowing much more stress. Stations 30 through 45 show that the mid section of the rod is too thick and stations 50 and 55 show that I missed the "Cattanach Hinge", which helps the rod roll cast. Rod #2 on the other hand is practically dead on. This is disappointing but the learning continues. I think it shows that removing the enamel after final planning doesn't allow me enough control over the final dimensions. I'll mic rods #5 and #6 tonight. They should actually end up being thicker than #4, which means the stress line will be lower.
|
|
|
4/24/05
Things are starting to take shape. More family stuff again this weekend but I managed to get the reel seats installed, grips shaped and ferrules installed. I need to fit the ferrules for 5 and 6 and then wrap the guides. The rods could use a little straightening but over all they came out pretty good. Especially the one with Garrison spacing. Hopefully I can get the rods wrapped tomorrow night. |
|
|
4/22/05 Well, I'm in the home stretch. The mids and butts for #4 and #5 have their last coat of varnish. The butt for #5 has its 3rd coat of varnish and simply needs to have the butt turned down for the reel seat and rod #6 has been scraped and is sitting in the drying box. I'm going to have to make a replacement tip for #6. The tip should work ok but a spline twisted as I was binding and ended up inside out. Rather than simply scrap the tip, I'll make a replacement in a week or two. If I've learned nothing else with these 3 rods it is that I need to concentrate on one rod at a time. It should be interesting to see how rods #5 and #6 hold up over time, considering the extended glue time needed to bind the rods. 4/21/05 Final planing is finished. I've glued up the butt for #6 and pulled the string off the tip and mid. Both the tip and mid are twisted. Ugh! The tips and mid for rods #4 and #5 have been given an additional 2 coats of varnish. I hand rub the varnish on and allow it to dry about 12 hrs between applications. This seems to work pretty well. 4/20/05 Rods #4 and #5 have been cut to size and given two coats of varnish. I'll finish the butt for rod #6 tonight.
|
|
|
4/18/05 More family stuff to attend to this weekend but I still managed to sew up 3 bags and finish the butts for #4 and #5. I'll scrape rod #4 tonight and get the handle glued on. Looks like it's all down hill from here.
|
|
4/14/05 Ouch. I glued the tips and mids last night. What a disaster. I need to find another way to apply weight to the binding cord. After the cord got really sticky, the weight would get caught up and jam the machine. I also need to replace the binding cord after each rod. Fortunately, I had made two cords last night. That second cord saved the day. I was able to remove the weight and use my hands to apply weight to the cord while pulling the cord through the machine. I'm a little concerned that rod #5 didn't get bound tight enough. # 4 went better and # 6 went pretty well except I think I may have twisted the tip. Rod's 5 and 4 where partially hand bound. The sticky glue made hand binding a real drag so I replaced the binding cord on the binder and figured out the work around. I had so much trouble that I think it took me 1hr 30 min to bind all three rods. The work time of the glue is supposed to only be 30 min. The glue is so sticky that I went through 8 pairs of gloves just so I could work without everything sticking to my hands. I'm definitely learning more with these 3 rods than I did with the last 3.
|
|
|
4/11/05 The mids are almost done and I should be starting on the butts this evening. I'm not finding the production method of rod making very satisfying. I'm definitely a one rod at a time guy. The upside I guess is that I'll have 3 rods when I'm done but I much prefer the feel of crafting a single rod at a time. I feel more in tune with the rod. I'll be glad when I've finished final planning.
|
|
|
4/05/05 PM: I'm really starting to hate tips. I had one stroke of the plane left on tip 6, spline #2 when, snap! The spline curled up as I finished my stroke and I caught it with edge of my palm. So what do I do? In frustration I grabbed a random spline that was used to heat treat the other two replacement splines, roughed it and planed to final taper in about 1hr. Here's the kicker. Instead of checking the angles, I simply eye balled the spline and the angle came out better than the original. I'd spent out 2hrs trying to get the original perfect. A lesson learned I guess. The replacement spline has a total heat treating of 40 min at 325. Yikes! 4/05/05: Final planning is going slow. I didn't spend much time in the shop on Saturday. I spent most of the day on Sunday in the shop but didn't get very much done. I'm currently half way through the tip for rod #6. I'm having a little problem with angles but hopefully it won't be too bad. I'm going to forget about trying to get rod #10 finished for opening day. Saturday I'm going to LA for a gathering. Whatever is done by Friday night will get glued and strung up. At the pace I'm going I might have a mid done by then.
|
|
|
3/30/05: Ouch, I've broken two splines on the tip for #4. Serves me right for trying to get three rods from a single culm. I didn't really have a back up plan and since this started out as a single tip rod, I've had to make due with some rather shoddy replacements. I bound two individual splines to two pieces of scrap cane and heat treated at 325 for 20min. This should turn out to be one interesting rod. Fortunately, it's for me. Not only that but I started planing the strips backwards. So I now have a node 3 inches from the tip instead of from the butt. Each rod's a learning experience and I guess I'll learn if having a node so close to the tip is really a problem. So far, each spline has broken at where the node fibers and long fibers meet. I'm shooting to have the first 3 rods completely planed by Sunday. I've had to order some new URAC glue. The stuff only has a shelf life of 6mo to 1yr. I thought I had purchased mine last September but I checked with the manufacturer and it turns out I picked it up last April. Yikes! It's good thing I checked before gluing up any rods. 3/29/05: Opening day is looming so I've pushed rod #10 into 4th position. Hopefully I can have it and the Sir Ds finished for opening day. 3/27/05: Houston we have final planing.
|
|
|
3/25/05: I did it again. I blew the hold down in the beveller. This time I figured out the problem. I pulled the strip slightly down as it exited the hold down which forced the edge of the hold down up and into the blade. On a positive note, I've got 4 more posts and I was able to straighten one of the bent posts last night. That said, I used the beveller to entirely rough the butt section of rod # 6. I modified my binder using the shrink tube to protect the rod but that didn't work. The tube created too much friction. I've reduced the weight on the binder from 16 oz to 8 oz and that seems to bind the strips without causing damage to the powerfibers. I heat treated rod #6 in the kitchen last night. This time I cooked at 325 degrees for 8 min. and then flipped and cooked again until I got that burnt popcorn smell. At about 12 min the rod stopped sizzling, so I guess most of the moisture had cooked off. The rod never did attain the burnt popcorn smell but the sweet bamboo smell got fainter and fainter. I stopped at 25min. The strips for rod #6 are quite a bit larger than rod #5. This may have affected how the rod cooked. Final planing is imminent. I need to cook rod #4, clean up the shop a little and I'm ready to. I might be ready as soon as tonight. Oh yeah, I've changed rods 8 and 10 to a Driggs and 761510 respectively. I decided I wouldn't fish a 3wt so why make someone else one. I am going to make it one of the Driggs tapers that I've found which isn't widely known. I've gone with the 761510 on rod 10 simply to have a tested taper. The 761510 might turn out to be a 5wt or a 6wt. According to the Dickerson records it could be either. That said, if it's anything like my 7613 "5wt" then it will end up being a 4wt or a 5wt. I'm hoping for a 5wt. It's got a huge butt, so it looks fairly beefy.
|
|
|
3/24/05: I haven't done much focused rod making this week. On Monday I glued the tip for Rod #2 and started to tune the plane I picked up on Sunday. Before leaving the Redding area, my fishing partner Joe and I hit the local antique shops; I found a Stanley #16 for $20. The #16 is the same as the 91/2 that rod makers swear by. The only difference is the plating. Tuesday I wrapped and varnished the tip. I used black gossamer thread instead of trying to do an "invisible" wrap. I figured what's the point. You can still see an invisible wrap and since this is my personal rod, why not just wrap it black and avoid the hassle of trying to get the invisible wrap. Invisible wraps don't always work and when they don't they're ugly.
I also managed to rough up the tip and mid for rod #6.
I've been using the beveller a little more, more so to correct my angles
than to actually rough the strip. One strip for #6 looks pretty bad, I
may have to toss it. I heat treated rod #5 last night. My oven's not done so I threw it in the old Thermador. We have the professional model which is just big enough to fit a 3pc 7ft rod. I baked it for 20 min at 325 degrees. At about 16 min I noticed the smell went from a nice sweet smell to that of burnt popcorn. Rod makers talk about knowing when to stop heat treating by smell- maybe this is what they mean.
I test cast rod #2 today. The tip seems a bit faster, probably because of the 5 inch wrap. Coincidentally, it's wrapped between the 2nd and 3rd stations on the planning form. This rod is the Sir D Favorite, ie. Wayne Cattanach's original taper. I'd imagine that the rod now feels like the Sir D taper modified by Daryl Hayasheda. His modification was to increase the the dimensions of the rod at stations 2, 3, and 4. Thereby making it a tad stiffer. It's not a bad change actually and I think one of the 3pc Sir D Fs that I'm making will be the Hayasheda taper.
|
|
|
3/19/05:
|
|
|
3/15/05: I've fixed the new beveller and used pieces of rod #5 to test it out. It works fine but I think I'll only use it on the rods with larger splines, namely #9 and #10. I read recently that beveller's can scorch the cane and this appears to be true. I had the 24 hr bug or something yesterday so I didn't get anything done. I put in a good 3hrs tonight and have rod #5 rough planed, bound and ready for heat treating. My new binder seems to be taking chips out of the enamel. I should be able to solve this with some shrink tube.
|
|
|
3/13/05: Spent the weekend straightening and I'm pleased to say that I AM DONE! I hate straightening. Love splitting, hate straightening. That's how it goes. It's on to roughing now. I'm going to rough each blank up and then heat treat as I get ready to plane each one. I've been struggling for a taper for rod 10. It's got to be a 7'6" 5wt 3pc and I've not been happy with the Sir D taper I came up with. I've had lots of input from folks but I'm just not sure. I think it may be better to go with an established taper like a Payne or Dickerson.
|
|
|
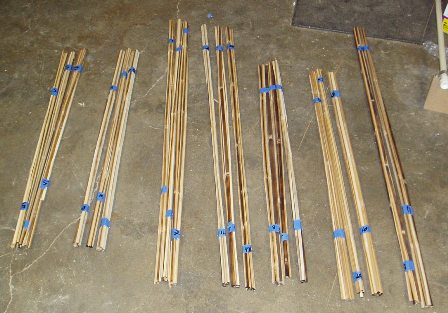
3/06/05: Filing and sanding is done and I've cut the splines, or bamboo strips, into manageable pieces. Each spline is a couple of inches longer than it's finished length. Except for 3 pieces for rod 5 which I accidentally cut 4 inches short. Fortunately, that makes the pieces almost exactly their finished length so it should be workable.
I also ran into a problem with rod #10. The power fibers in the mid section were a little on the scarce side; I pulled 3 spines out and decided to cut 3 new splines from the butt section. I measured and spaced the new splines next to the wrong 3 pieces and all 6 of the nodes ended up in the same positions. The new splines were made by cutting the butt culm in half and using the upper half. In order to fix the problem, I matched the upper half with the bottom half of the same strips. This set the nodes about 2 inches a part, which should be fine. I've dropped rod #11 the modified Sir D, in favor of the Driggs River Special. If all goes well, it looks like rods 6 and 7 will be really nice. I don't know why, it just feels like they will. 9 Should be pretty good too. So far only 9 has gone off without a hitch. The power fibers in 9 are really dense. I should be using the culm for 9 to be making 10 but 10 needs to be blond and 9 had too many flaws. Rod 5 is a bit of a misfit. I'm not quite sure where I got the splines from. I think perhaps rods 7 and 9. I just pulled a bunch of extra splines from the rack and used them. I had enough for 3 sets of 6, so each section of the rod may come from a different culm but the splines within the same section come from a single culm. I'm staggering the nodes on rod 5 Garrison style, it should be interesting to see if there's a difference vs. my normal 3x3.
|
|
|
3/02/05: I'm almost done with the filing. I've decided to finish filing #7 but to sand number 10 instead. I seem to be doing a better job sanding the nodes than I am filing. I seem to be going a bit too deep. In any case, I've started sorting through the splines and pulled out enough cane for #7 with two tips and enough cane for the two tips of #8. There's been some talk on the Bamboo Rod Forum about the Young Driggs River Special. I've always been interested in this taper and all the discussion has simply brought it to the fore. I managed to find 10 different tapers for the rod (you've got to love rod makers) from line sizes 3wt to 5wt and 7ft 2inches to 7ft 3inches. The rod's supposed to be 7ft 2inches so there's no confusion there. After throwing all 10 tapers into Rod DNA, which will give me the "flavor" of each rod, it looks like 7 are derivatives of the other 3. Folks either made changes for different line weights or forgot to deduct for varnish where necessary. It's all pretty obvious once you get the tapers graphed. I'm thinking of substituting one of the Sir D Favorite 3pc rods for a 3pc Driggs. I can use rod DNA to change the rod from a 2pc to a 3pc. It's a 5wt so it's a little heavy. Maybe I'll make two and make one a 4wt.......so many rods so little time.....
|
|
|
2/28/05:
Well, this weekend was supposed to be a big shop weekend...but it didn't happen. Vita was gone and I don't like leaving the dog alone in the house when someone's home. She can't join me in the shop when I've got all the machinery running so I spent half the weekend playing Xbox live and the other half watching the Lord of the Rings trilogy. Queen was at my side the whole time. Last week I received my roughing beveller and promptly broke it. One of the hold downs somehow got caught in the blade. Fortunately, I managed to find the original maker and he's going to make me a replacement piece. Needless to say, I'm going to be roughing by hand for a while. Tonight I got some work done sanding and filing nodes. I'm trying 3 different methods of node prep with this current batch of rods to determine which one I like best. It'll be interesting to see if I can see a difference in the final product.
Finished Rod Wrapper. It looks like rod number 6 is going to be made from a single tip portion of a culm. The culm had originally been picked for rod number 9 but I started to split the culm before I had flamed it. I lightly flamed each spline after I split and it will be interesting to see how things turn out. The nodes for rods 6 and 8 have been sanded and I'm in the process filing the nodes for rods 7 and 10. The splines for rod 5 will probably come out of the batch for rod 7 and it doesn't look like I'm going to have any extra from rod 11 so it may have to wait. After I do the node prep I'll sort through the splines to remove the junk. I'm going to vary my routine by staggering and cutting the splines to size before I rough them. That way I only prep what I need instead of prepping everything and sorting through what I need after. The later method has left me with splines for rod 4 but this time around I want to do things as efficiently as possible.
|
|
|
2/21/05:
President's Day and I'm trying to get do a little work on the web site. I've spent the past few days in the shop splitting cane and finishing the rack and wrapper. The rack has dried from its last coat of finish and the wrapper still needs another 2. I selected and split most of the cane I think I'm going to need for the above rods. I picked out cane specifically for rods 7- 11 and will hopefully have enough left over for rods 5 and 6. The cane for #4 is what I have left over from rods 1 and 2. Rod 1 was made from great cane and I'm pretty fortunate that I've been able to squeeze 2 maybe 3 one piece rods from it.
|
|
|
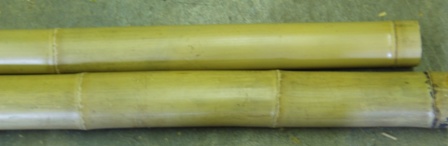
The culm for rod 9 before splitting and flaming. This is big beefy cane.
The culm for Rod 9 after flaming and during splitting.
|
|
|
Rod 10 is a challenge. It's needs to be blond and most of my
cane isn't pretty enough for a blond rod. Before I store the cane I grade it
A thru C for cosmetics and power fiber content. Rod 10 is going to be made
from one of the few A/A culms I have. I've also had mold problems again. Several of the culms had a little mold. Fortunately it was slight. I treated it with bleach and split as usual. In addition some of the cane seemed to be a little green. This may also prove to be a problem. All of the cane was straw colored during the summer, I can only presume that the humidity of winter has caused it to turn green much like a potato that's been sitting out too long. |
|
|
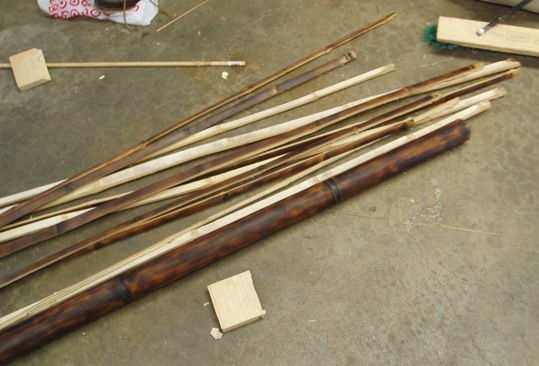
Splitting a culm for rod #10 |
|
|
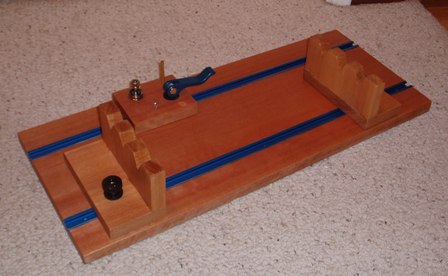
2/13/05: I spent most of the day working on finishing the rod wrapper and working on the binder. The binder looks like it will work out well. The wrapper simply needs some shellac.
|
|
|
The binder waiting for a spool and a little more assembly. |
|
|
2/12/05: Geez, what a pain. I spent about an hour and half today at the local hardware store trying to ferret up parts to build a Garrison binder. I studied all the binder plans in the various books and decided to follow the directions of Chris Bogart. Unfortunately, no one but Garrison provides a parts list for the binder so I figured I'd simply walk into the hardware store, show them the picture and say, "I want to build this." Well, that didn't work so I spent the next hour cruising their aisles looking for stuff that might work. Fortunately, I found enough stuff that I think I can get a good binder going. I picked up some more wood for the rod rack and managed not to destroy is on the router table. The rack is done and simply needs a finish. 2/10/05: I aspergered on a rod rack and rod wrapper design this morning on the way to work. I finished the plans before work and true to form was at Rockler and Home Depot this evening picking up the necessary parts. The rack will be made of Oak and the wrapper of Lyptus. All the parts were cut and I was routing the rack by 9pm. Both woods are hard; the Lyptus routed pretty smoothly, the Oak on the other hand disintegrated. Seems I made the indentations for the rods too deep and too close together so I wasn't able to finish the rack. Not a good thing, so I channeled my energy into picking the cane for my up coming rods. The first culm was of course riddled with mold. This surprised me as I thought I'd thrown away all of the moldy culms. This culm was in the shop, which is doubly strange because NONE of the culms in the garage should have had mold. I won't allow the stuff in the house. I've tried working with some of the moldy culms but the more I work a culm the worse the mold seems to be. I'm just hoping that it doesn't spread to my good culms.
|
|


 I'm
still working on roughing the rods. 3 of the blanks are already bound.
I've got one rod left to rough . Roughing is where you really find out
how good a job you did straightening and pressing.
I'm
still working on roughing the rods. 3 of the blanks are already bound.
I've got one rod left to rough . Roughing is where you really find out
how good a job you did straightening and pressing.
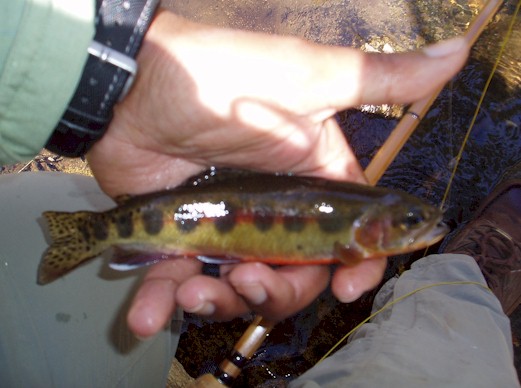


 I
went fishing today with the idea of putting rod #2 through it's paces by
catching some hot 16 and 18 inch Lower Sac rainbows. Unfortunately, a
cold front moved in and shut the river down. We didn't see anyone catch
a fish all day and to top it off, I broke the tip of the rod off while
putting another rod away. I had #2 in my left hand and my
I
went fishing today with the idea of putting rod #2 through it's paces by
catching some hot 16 and 18 inch Lower Sac rainbows. Unfortunately, a
cold front moved in and shut the river down. We didn't see anyone catch
a fish all day and to top it off, I broke the tip of the rod off while
putting another rod away. I had #2 in my left hand and my

